In order to sell pre-made amigurumi on My Etsy store I had to take some photos.. glamour shots.
So my camera isn’t high-end amazing, it’s a Canon PowerShot SD750 7.1mega pixel that I bought back around 2007ish, however it has served me well for my photography needs at this time (well… not counting when I take it to concerts, then it’s kinda crap).
Onto the photos!
Big Momma Orca
Baby Orca
And the most photogenic of all, Blue Jelly!
*Jellyfish salute*
I don’t know why my jellyfish amigurumi are always so photogenic and love to pose.
I should mention I froze my ass doing the outdoor pictures as it was 2 or 3 Celsius outside.
I love it when my nails match my crochet or knitting project. See below:
<3 <3 <3 I LOVE IT! <3 <3 <3
I've started making Dragon Fly Wings (ravelry link) for something to do on the skytrain or my work breaks. The last few days I was doing amigurumi, but I found it to be tedious as I’d lose parts, or my scissors, or need to put it down until I had access to my doll eyes and stuffing.
So far, the pattern is pretty straight forward (and good for a free pattern).
I found this wonderful yarn, Shadow Lace in “Foxtrot” from KnitPicks and I had to buy it. When I was in California with my fiance, he rolled the hanks into balls (his favourite job).
Oh.. and the amazing polish I’m wearing? Magnetic polish! <3
I snagged the Layla “Turquoise Wave” from London Drugs and the LCN “Iron Magic” and “Fushia Attraction” (which I’m wearing) with a star magnet from NailPolishCanada. Magnetic polish is overall pricey, but the end result is a neat effect.
Too bad I don’t have an amigurumi project I’m working on that is a lavendery purple. At the moment for amigurumi I’m in a “Mass production/ Orca breeding pit” mode.
Sigh.. I’ve made a couple really cool projects, however I cannot post them until after christmas! They are all gifts and the recipients might find out what they are getting! Damn. The good thing is that I’m done all my holiday gift knitting/crocheting.
Well right now I’m inbetween projects, pattern creation hatred/break/slump, so I’ve been churning out some of my other patterns – Orca’s and Jellyfishes. Right now, I got a few orcas done.
Very cute!
I’ve plopped this guy into my Etsy Shop for adoption, however I don’t think he’ll last too long. I will have a few more and some jellyfish up by the end of this month. Due to time restraints and custom orders, me selling pre-made amigurumi might not come that often.
~~~
In other news, I’ve been trying to create a new pattern, but now I’m on my 6th revision UGGGGGG!! Though this also helping me streamline on tips for creating patterns to help you all out there in the future.
I also have to show this off:
My engagement ring! So happy it doesn’t snag on yarn when I’m crocheting or knitting!
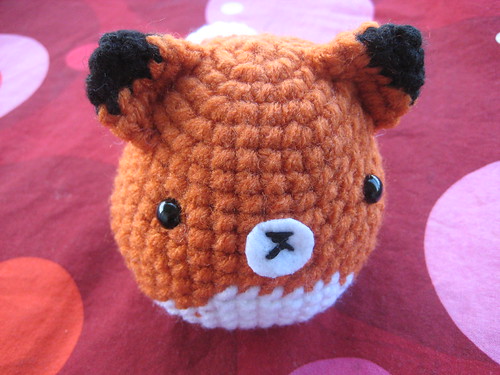
I had a commission back in August for a sheep. Well, a sheep and a fox.
For the sheep, I used my Amigurumi Critters pattern making a bigger felt face and rotated the ear to the side.
For the fox.. well.. I followed my own pattern!
More Pics!
hmmm… wonder if I could shave the sheep to make more yarn? Maybe it needs to be made in furry yarn first? <3
One of my pet peeves is mistaking knitting for crocheting or crocheting for knitting.
I found this at my local Yoko Yaya (Japanese dollar store similar to Daiso), located in Downtown Vancouver. I tried lace crochet, but felt like I’d go blind doing it.. but the packaging sold me on its wrongness.. but hopefully not to encourage this.
Close up:
I’m not sure how smoothly I’d knit with a crochet hook.
To add to some more randomness… cookies I made for a “BAKE OFF!!” I had with a co-worker
I made with this recipe halved, with some cocoa powder.
More crochet stuff to come, I`ve been designing patterns right now (unsuccessfully) and been working quite a bit (16 hours OT shifts! ARGG!)
I revised my Dolphin pattern to include a white tummy. Unfortunately, this was a horrible painful process that I wouldn’t recommend a newb crocheter to attempt.
The white tummy is crocheted at the same time as the entire body. My pattern philosophy is sewing additional parts sucks! However my hatred of sewing comes at a price of insane yarn colour changes. So if you can handle lots of yarn ends, go for it! At least in amigurumi you hide the yarn ends inside the form, so there is no ends to weave in. You can knot them as ugly as you want and no one will ever see (unless you rip it open.. but who would do that?)
Making this guy did make me realize spiral rounds actually spiral around (duh) not making the form even when a block of colour is added. I didn’t account for this much in this modification, but it’s only noticeable if you look under the tail >__< uggg.
The final product is pretty cute though <3
Pattern Available at My Etsy Shop or via Ravelry (no account needed).
On another note, my eye order from CR crafts arrived. 450 eyes and 36 noses (I’m insane). Most of the eyes are clear and I went for larger eyes
– 10mm, 12mm and 15mm. I’m working on another insane yarn colour changing pattern, so I’m happy I can progress further now that I have the eyes!
Amigurumi Eyes – one of the big roadblocks in getting your amigurumi to look like all the other amigurumis out there. Roadblock? Well, it can be a pain in the butt finding a place to buy these eyes for a good price! I remember when I was starting out to make amigurumi, I couldn’t find the eyes anywhere, and the finished product just doesn’t look right without those round black eyes.
I’m going to talk about 1. Where to buy, 2. What to buy, 3. Other options
Firstly, here’s my eye stash
(yeah, there’s some bells mixed in there)
From top row, left to right – 8mm noses, bells, 10mm brown eyes, 12mm blue eyes, 4mm black eyes, 8mm black eyes.
middle row – 15mm noses, bells, 10mm yellow eyes, 12 mm cat eyes, 6mm black eyes
bottom row – googly eyes, bells, 10mm blue eyes, mix of amber eyes, 4mm clear eyes, mix of 8mm clear eyes and red eyes.
I’ve recently had to order more as I need some bigger black eyes, around 10mm-15mm, plus more clear eyes in a larger size… and some noses.
Where to buy:
Online
+ Cheapest price, especially in bulk
– Have to wait for shipping
(- sometimes you don’t want the eyes in bulk or you prefer to buy locally)
I’m all for going online to buy my eyes. I’m not paid by these guys, but I’ve gone with CR’s Crafts with great success. At the time I write this, 8mm x 100 eyes are $5.12. 100 of them! That’s 50 amigurumis!
Also, Etsy has plenty of sellers that sell eyes!
Craft Store
+ Local, can see the product in person
– can be expensive
– limited options
When I first got into amigurumi, I hit my local craft store. All I could find was this stuff:
Which is fine, but if you want that black eye look you are SOL. When I bought those eyes, it was on sale for like $4.99 for 6 (vs online for $5 for 100 = WTF).
Also, these coloured eyes are inferior to the clear eyes, which I’ll talk about later on.
Asian Craft Store or Asian Dollar Store
+ Better bet to find black amigurumi eyes
– still not as cheap as online
– limited sizes or selection
I’d recommend hitting (if you have one) an asian craft store or dollar store. One craft store (Yaohan Centre in Richmond, Vancouver, if the craft store is still there) I snagged some black eyes that were sold seperately but I can’t remember how much, lol… around $0.50 an eye I think. However, I’ve also found eyes at Daiso and Yoko yaya – Japanese dollar stores, in their craft section. There, everything is $2, thus a pack of 6 eyes is $2.
So, to sum that all up, if you are new to amigurumi, I’d hit Daiso if you can. If you want ultra cheap, need eyes for your amigurumi octopus death army go online. When I order, I order a lot to save on the shipping. Maybe see if your crafting buddies need some too and order together!
Now you have some ideas where to go… but What to buy? It really depends on the size of the amigurumi you make.
With my patterns, I mostly use the 8mm black eye for an amigurumi around 4″ to 6″ round. For mini amigurumi that’s around 2-3″ round, I use the 5mm or 6mm eye.
I have a lot of teeny eyes, 4mm and I NEVER use them! Unless you are making amigurumi that are like 1″ long, or want squinty tiny eyes, I wouldn’t buy them. The picture below is the 4mm eyes I never use.
Noses have great uses too. Here is 9mm and 15mm noses.
I’ve used them for noses of course, but they make great bird beaks! Again, size is tough for these depending on your look, but I found the 15mm is the best for the 5″ amigurumi. There are also more oval noses (which I just ordered) that would make good eyes as well.
Clear eyes are great purchase instead of coloured eyes. Why? Flexibility!
When you look at most coloured eyes, it’s just the backing that is coloured. Also, those fancy glittery glass eyes are pricey, and you can get a great effect with the clear eyes.
I use nail polish (which I have a TON of) to paint the back of the eyes. A Duo-chrome, multiple toned polish works great. You can also use glitter polish. Below, I used a Sally Hansen HD polish in “Lite” (yes, that gnary yellow polish)
Here I hold the eye with a set of tweezers so I don’t get polish on my fingers and ruin my current manicure (OPI in “Stranger Tides”). Feel free to go crazy and paint in more detail like lines or a different colour around the rim of the eye. You may also apply tape around the edge of the eye so you don’t leak polish onto the globey round part (or just use nail polish remover to take off any smears).
The result is a pair of glittery yellow eyes that sparkle!
Also to keep in mind is if the backing is included in the eyes or noses
Backing varies between eye size, but either way it holds the eye onto the amigurumi. Some eyes do not have a backing but a hole through the stem which you will need to tie the eye on from the back, or have a more dangly eye look. In the past I’ve ditched the backing and would glue on the eyes, but using the safety snap backing is a more secure option.
What are you other options?
What if your amigurumi is for a child? Or you cannot find eyes at your local craft store/ don’t want to buy online? What if you need bigger, crazier eyes (like psychotic spiraling red ones for your amigurumi octopus death army)
– Embroider on the eyes with black yarn or floss
– Buttons (you can get buttons that have a backing instead of the typical holed front ones)
– Make them yourself with polymer clay
If going the clay route, pick up some glaze to make your eyes shiny! There is also transparent clay so you could make some interesting effects!
Hopefully that helps some of you with your amigurumi eye problems. Now I have to sit tight while I wait for my eye shipment to arrive… around 400 eyes and noses! Shoot, I better make enough amigurumi for that!
So I apparently lied and I did have time (and space) for another Amigurumi Critter variation. I love rabbits! As a teenager on a farm, we had 50 rabbits at one point. When I was in university I got a netherland dwarf rabbit that was 3 pounds of disapproval and hate (when there was no treats involved). Bunito was awesome, he wasn’t the cuddly type, but he love to explore and was always up to mischief. He passed away a few years ago at the age of 8 by a stroke. Now I kinda want another rabbit again.
Meet “Bun”
Bun is a doe-eyed rabbit made from my Amigurumi Critter pattern, with addition to longer ears and a pompom tail. I think my next rabbit I want a black and white one like this… or a flemish giant (to my boyfriend’s horror).
So for peeps for have the pattern, the ear modification is using the ear for the Hamster/Squirrel and adding an additional 6 rows of all Single Crochet.
Some more pics of “Ham” as I failed in my first post about this pattern and didn’t have additional pictures of him.
Rabbit disapproval all the way
the pattern (via Ravelry, no account needed) or via my Etsy shop.
And totally check out my nails this week:
Sally Hansen HD in “Lite” with OPI “Black Shatter”.
I was rocking just “Lite” and I had only complaints of “EWWWW YELLOW NAILS”. I’m unsure whether I just liked the yellow as a colour and just bypassed yellow looks bad on me/kinda icky as nails. Who knows. Either way, I did some shatter ontop and it looks wicked!
Today is game 6 of the playoffs and Vancouver is a nutty place to be. Worse is that I work in downtown Vancouver and the crowds are crazy during a game!
Despite the crazyness, I was able to finish my skytrain knitting project, which is a project I bring with me when I’m on the train to work (and work breaks lol).
I used 2 circular needles and it was much easier than 5 DPNS of hell. The sock pattern is http://www.ravelry.com/patterns/library/basic-ribbed-socks and it was okay. The gusset and toe directions could of been written better but I got through it. It’s sized for a guy’s foot, so it’s a little too big for me.
Close up shot:
While we are on about the Canucks, I did a couple Canucks manicures myself to get into the spirit of things. Annoyingly, these manicures got the most compliments from strangers than any other ones I’ve done.
Nail polish used:
sinful colors – sanfransico
sinful colors- midnight blue
sinful colors- tokyo pearl
La rosa – 07 green crackle
This manicure is the same manicure as above, but I added a green crackle ontop to be lazy and keep my manicure longer.
This pattern seriously took me almost 8 months to finish. Why? School interference, computer breaking down taking my progress photos with it and mass pattern testing.
My idea was to make a template body and from there, branch off into multiple creatures. Of course, testing each critter was a pain and took awhile.